Howzit Guys.
I thought I would write a small check list of things to do once you have bought a 200SX. I know Toby has covered the what to look for when buying a SX .
Most of my suggestions relate to the stock ECU Fueling and idle control Equipment and to the CA18DET.
I take no responsibility for any damage’s that might occur these tips have worked for me in the past.
Most 200SX are more then 10 years old and that’s a lot of abuse from previous buyers. Here is a small list of Items I would check or change on the car after purchase even if you got the car from a Nissan dealer, friend or a doggy garage.
These Suggestions are not cheap you will need to spend a few bucks on you ride but it could possibly save you some money down the road. Some of these suggestions might not be liked but they have worked for me. If you are too scared to fiddle on you new car then only do the items you are comfortable with
Items to be bought: Air Filter (If still stock), Spark plugs, Fuel filter, 2 x Oil filter, Cheap oil, Good Synthetic oil, 4 x tin of Carb cleaner, Ear buds, Sanding paper and Clean Green * Optional - Oil change helper*
Tools: Basic hand tools and Spanners plus a comp tester.
1.) Removed all intake and intercooler piping also if possible remove the Intercooler (The stock Pipes, Turbo and Intercooler fill over time with oil vapor from the PVC system) once removed spray all the piping inside and out with Clean Green along with the intercooler if removed and wash out all piping and the intercooler to removed oil residue also check that the spring in the intake pipe is properly seated once all the piping is clean place in the sun to dry also remove and clean the stock airbox if the item is still there.
2.) Now that the piping has been removed you have access to a few vital area’s, next take the AFM and loosen the two top screws and slide the unit out of the Ali body once this is done spray Carb Cleaner on a Ear bud and proceeded to clean the AFM hot wire there are two wires you need to clean you need to be very careful not to break the wires. The hot wire builds up with dirt and grim over time causing the car to return incorrect readings to the ECU costing you fuel and performance once the AFM hot wires are clean assemble the unit by pushing it little into its housing and installing the screws.
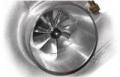
3.) * Note the next suggestion might be frowned upon but it worked for me* Spray carburetor cleaner into the front and outlet of you turbo charger you will be amazed at the dirt and oil that has caked onto the blades and back housing over the years to the hot turbo spray till the liquid is clear. I would blow the remaining liquid out using the cold pipe as a funnel. Carb cleaner will evaporate over time.
4.) Next start cleaning the throttle body with carb cleaner dirt and grim also start to cake onto the throttle body over time as well use a old covered in carb cleaner cloth to remove any dirt caked onto the butterfly.
5.) Next remove the IAA (idle air adjusting unit) located on the side of the intake there are three bolts and you need to remove the hose be careful not to break the gasket it normally sticks to the unit. , Next start cleaning this unit 80% of idle problems are caused by this item being dirty once done reinstall the item.
6.) Next clean the air regulator valve located below the throttle body it has a black cover there is no need to remove this item
*** Next leaving all the pipes disconnected and the AFM unplugged but all idle control devices connected, Start the car, it will be hard the start the first time and you will need to keep the throttle down normal this is where you will see a few clouds of smoke as the engine burns up the oil filled carburetor cleaner, Now spray the remaining carburetor cleaner into the intake to clean it. Remember to keep the engine running so don’t spray too much once you have emptied your current can switch off the engine and reinstall all the piping making sure all the clamps are correctly installed. ***
I will fill in the rest tomorrow
PFB SX Cleaning Tips Check-List.
Moderators: P3g4sus, Daniel, rat, Draco, Riekert
-
Pinkfluffybunnys

- Over Boosting
- Posts: 1693
- Joined: Thu May 08, 2008 1:21 pm
- Car: Other
- Engine: SR
- Real Name: Ashley
- Location: Pretoria
PFB SX Cleaning Tips Check-List.
2008 Mazda 6 MPS - Daily Drive
1\4 Mile:
1993 Nissan Sentra 200STI SR20VE – Mild VE
1\4 mile: 14.815 @153km\h @ ODI --- 1KM:195Km\h
Because Race Car
1\4 Mile:
1993 Nissan Sentra 200STI SR20VE – Mild VE
1\4 mile: 14.815 @153km\h @ ODI --- 1KM:195Km\h
Because Race Car
i cannot reiterate enough how important cleanliness is...
not only for your own health but for your engine too!
you could always make like i do, and strip the motor and gearbox out, and then completely strip everything on it, and clean every little piece down to the last nut and bolt. LOL - its hard work, but the end results are worth it!!!
then attack the interior and strip it out completely, and clean everything before reinstalling it!
i did that about 4 years ago to my interior, and many many parts are still spotless!
for the engine - you could always replace as many nuts and bolts with new pieces too. its awesome to see new parts on a newly rebuilt engine. worth the effort? well, thats up to the owner. i reckon it is, but then again, i am a little OCD about car cleanliness!
-
Pinkfluffybunnys
- Over Boosting
- Posts: 1693
- Joined: Thu May 08, 2008 1:21 pm
- Car: Other
- Engine: SR
- Real Name: Ashley
- Location: Pretoria
Time to continue.
Once all the piping has been installed take the car around the block to get a bit of heat in her next stop the car and empty the “Oil flush bottle” into the oil. Let the engine run for about 15 minutes giving her a few Rev’s to keep the oil pressure up. After 15 minutes change the oil and oil filter then install a new filter and fill the engine with the cheap oil you bought run the motor for 15 more minutes giving her a few little rev’s switch the car off and start draining the oil let the oil drain slowly for around 10 minutes once done change the oil filter again and fill the motor with you new expensive synthetic oil.
You will be amazed at the dirt and grim that will come out of the motor I sometimes repeat the cycle twice with cheap oil just to get ride of all this cr@p. Once the Oil has been changed start the motor let her warm up and check the level once done remove the spark plugs now come the moment of truth install a compression gauge and test the compression of the motor this will help you figure out what you are working with check the vales with the FSM once done swap out the spark plugs set the gap to stock 1.0 -1.1mm unless you getting ignition break down, I’m running 0.8 bar and I’m still on 1.1mm and planning to run the same on 1 bar if I do get break down I will try to upgrade the coils.
Next swap out you fuel filter and air cleaner if you are stock. Once done find the grounding strap located on the earth of the battery it should connect on two place’s the body and the intake manifold Remove the bolt holding the strap to the body and using the sanding paper clean off all the corrosion that has built up over the years from both the strap and the earthing point once done reinstall the strap. This will help solve a few electrical issues that I have seen on a few SX’s in the past.
2008 Mazda 6 MPS - Daily Drive
1\4 Mile:
1993 Nissan Sentra 200STI SR20VE – Mild VE
1\4 mile: 14.815 @153km\h @ ODI --- 1KM:195Km\h
Because Race Car
1\4 Mile:
1993 Nissan Sentra 200STI SR20VE – Mild VE
1\4 mile: 14.815 @153km\h @ ODI --- 1KM:195Km\h
Because Race Car
-
Pinkfluffybunnys
- Over Boosting
- Posts: 1693
- Joined: Thu May 08, 2008 1:21 pm
- Car: Other
- Engine: SR
- Real Name: Ashley
- Location: Pretoria
PFB Stage 2 Cleaning and Replacing.
-------------------------------------------------------------
Once you have done the stage one cleaning listed above you might want to try the stage two cleaning and replacing
Again you will need to spend some money on your ride I have listed the items below.
Items: Ferodo 5.1 Brake fluid, Gearbox oil (API GL-4), Diff oil (API GL-5). Power steering Fluid ( Dexron), 2x Wynnes Anti Freeze, Clean green
Tools: Basic hand tools and Sockets, Pressure washer. Piece of hose and a funnel
1.) First item we will start with is the cooling system, I know a lot of people don’t even look twice at the cooling system by average its recommended that the Anti freeze be replaced at least 1 every year, In most of the sx’s I have seen I don’t think it was ever replaced. Remove the bottom pipe of the radiator then remove the top pipe. While the water is draining remove the radiator and fan shroud there is a small plastic strip at the end of the shroud that will allow it to slide past the clutch fan. Once done I poured a little Clean Green into the radiator blocked off both ends moved to around to coat the inside. I then left the radiator to soak and used a pressure washer on the AC radiator from the inside of the engine bay to push out all the bugs, leaves and cr@p that has built up over time. (Make sure the pressure is not bending the cooling fin’s)
Then I removed the coolant bottle and soaked that in clean green then used the pressure washer to remove the dirt inside and out I also used the pressure washer on the radiator and the inside then switched over to normal tap pressure to push the remaining coolant out of the block once done I installed the radiator and hoses and mixed 30% anti freeze with 70% water. You can increase the water for better cooling. Started the car and toped up the coolant level
2.) Next item is the brakes; I recommend this to any Nissan owner because 9 times out of 10 that soggy feeling in the pedal is old 3 dot brake fluid. Break fluid breaks down in water so the moister in the air around use slowly works on it over time and after 10 year it doesn’t work very well, First open the cap on the brake fluid bottle in the car and using tissue paper try to drain as much of the old brake fluid as possible be careful not to get it on the body because over time is will eat the paint. Next fill the bottle with you new dot 5.1 fluids. Then following the FSM and starting at the back start bleeding the brakes till the fluid is clear and free of any bubbles. Also remember to keep topping up the bottle because bleeding the ABS unit is a biatch on average check the bottle ever 4 bleeds to make sure it does run dry. It is a time consuming job but well worth is as the brakes on my car felt better and responded better also pad wear was more consistent.
3.) Clutch bleeding the clutch works on the same system as the brakes and over time it gets soggy so using the same method as listed above drain the clutch fluid and use the new 5.1 fluid on the clutch system.
4.) Power steering, I was also amazed that know one drains the old power steering fluid after 10 years of service, when I drained my power steering fluid it was black and didn’t smell to good.. Replace with Dexron
5.) Gearbox Oil. This oil also doesn’t seem to get replaced very often. Loosen the bottom drain plug and the side plug. Once the oil had drained re-install the bottom drain plug but leave the side plug off, then fill the gearbox from the top by removing the shifter. You will need a pliers keep filling till a little oil come out of the side plug once done re-install and torque all the bolts re-install the shifter.
6.) Next is the Diff Oil. This also never gets renewed. Check that you can loosen the side bolt first because if you drain the oil and cant put it back you will be in big Sh^T then loosen the bottom drain bolt drain the oil out then tighten up the bolt, Once done using a long hose and a funnel feed the oil in using the side hole from out side the car it will take time for the thick oil to go in once the oil is dripping out the side re-tighten the bolt your done
2008 Mazda 6 MPS - Daily Drive
1\4 Mile:
1993 Nissan Sentra 200STI SR20VE – Mild VE
1\4 mile: 14.815 @153km\h @ ODI --- 1KM:195Km\h
Because Race Car
1\4 Mile:
1993 Nissan Sentra 200STI SR20VE – Mild VE
1\4 mile: 14.815 @153km\h @ ODI --- 1KM:195Km\h
Because Race Car
-
Pinkfluffybunnys
- Over Boosting
- Posts: 1693
- Joined: Thu May 08, 2008 1:21 pm
- Car: Other
- Engine: SR
- Real Name: Ashley
- Location: Pretoria

agreed 
some few extra notes...
when PFB says brake fluid eats paint over time, he means like within 10 minutes!
you can fill the gearbox with oil using the same funnel (mounted high) with a long hose. try to get a clear hose, so that you can see the oil running in, and when it stops!
a thin ID on the clear hose might mean that it will take fairly long to fill the gearbox and diff. size does matter!
-
Pinkfluffybunnys
- Over Boosting
- Posts: 1693
- Joined: Thu May 08, 2008 1:21 pm
- Car: Other
- Engine: SR
- Real Name: Ashley
- Location: Pretoria
I forgot to add.
I did this cleaning on the sentra this weekend took 4 flushes to get the oil clean but its still clear 5 days on .
Also the engine is smoother and less noisy
I did this cleaning on the sentra this weekend took 4 flushes to get the oil clean but its still clear 5 days on .
Also the engine is smoother and less noisy
2008 Mazda 6 MPS - Daily Drive
1\4 Mile:
1993 Nissan Sentra 200STI SR20VE – Mild VE
1\4 mile: 14.815 @153km\h @ ODI --- 1KM:195Km\h
Because Race Car
1\4 Mile:
1993 Nissan Sentra 200STI SR20VE – Mild VE
1\4 mile: 14.815 @153km\h @ ODI --- 1KM:195Km\h
Because Race Car

I did this cleaning this weekend and it went really well. Thanks for the article PFB, the SX is now feeling super smooth. My cheap oil came out proper black after only 15 minutes. Engine feels much happier now  The gearbox oil is where I noticed the most difference, changing the oil there has definitely made the shifting action lighter and smoother.
I also wanna say a huge THANKS to Trance for all his help. It woulda taken twice as long without him. Shot for all your help man!
I also wanna say a huge THANKS to Trance for all his help. It woulda taken twice as long without him. Shot for all your help man!
What you get when you don't get what you want is experience.
-
Pinkfluffybunnys
- Over Boosting
- Posts: 1693
- Joined: Thu May 08, 2008 1:21 pm
- Car: Other
- Engine: SR
- Real Name: Ashley
- Location: Pretoria
