
Sack some nice work on here!
well done mate.
Senshi - Project "Evangelion" Full Blown Street Drift
Moderators: P3g4sus, Daniel, rat, Draco, Riekert
-
POWDER

- Club Rep
- Posts: 1204
- Joined: Fri May 15, 2009 12:19 pm
- Car: S13
- Engine: SR
- Real Name: Mike
- Location: Johannesburg
Shot Cuz, O and P.S. I LOVE your Avatar. Where can I find a set of those for my S13, would love to get a set for my Front Passenger seat?Daniel wrote:Sack some nice work on here!
well done mate.
Carpe Diemotor - Sieze the motor today

- Nissan 200SX S13 92' SR20DET
http://200sx.za.net/phpBB3/garage_vehic ... cle&VID=14
- Nissan 200SX S13 92' SR20DET
http://200sx.za.net/phpBB3/garage_vehic ... cle&VID=14
-
POWDER
- Club Rep
- Posts: 1204
- Joined: Fri May 15, 2009 12:19 pm
- Car: S13
- Engine: SR
- Real Name: Mike
- Location: Johannesburg
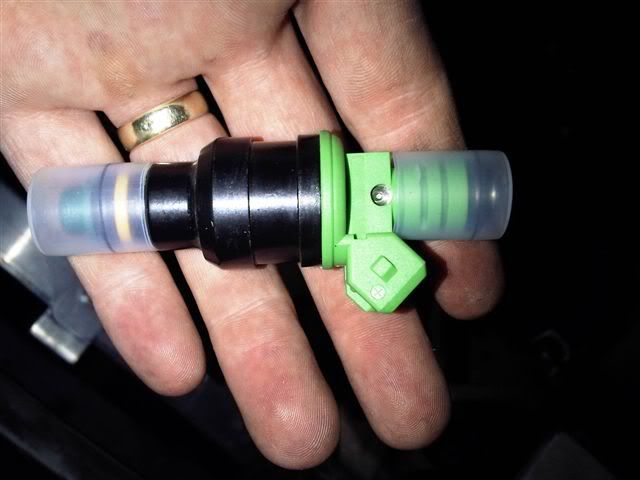
Well, got my Injectors over the weekend and fit my Fuel Rail. Looking real good, well as good as a fuel rail can look I suppose, Had to make a few mods to things to get it to fit, but will post pics of that too anyway.
Keep a lookout....
Keep a lookout....
Carpe Diemotor - Sieze the motor today
- Nissan 200SX S13 92' SR20DET
http://200sx.za.net/phpBB3/garage_vehic ... cle&VID=14
- Nissan 200SX S13 92' SR20DET
http://200sx.za.net/phpBB3/garage_vehic ... cle&VID=14
-
POWDER
- Club Rep
- Posts: 1204
- Joined: Fri May 15, 2009 12:19 pm
- Car: S13
- Engine: SR
- Real Name: Mike
- Location: Johannesburg
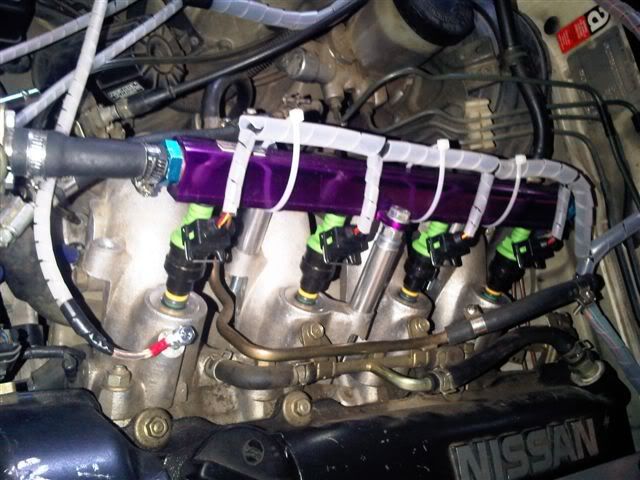
5. After market fuel rail and fuel injectors install
- Fuel Rail and 440cc Bosch Injector Settup
(Once again, I will do the texts later, but here are the Pics anyway)
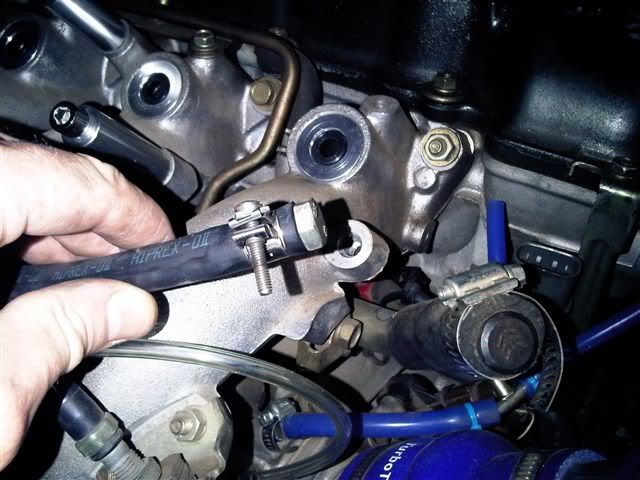
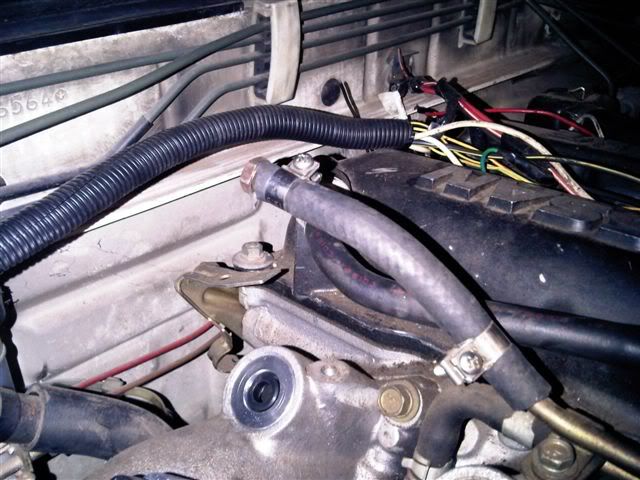
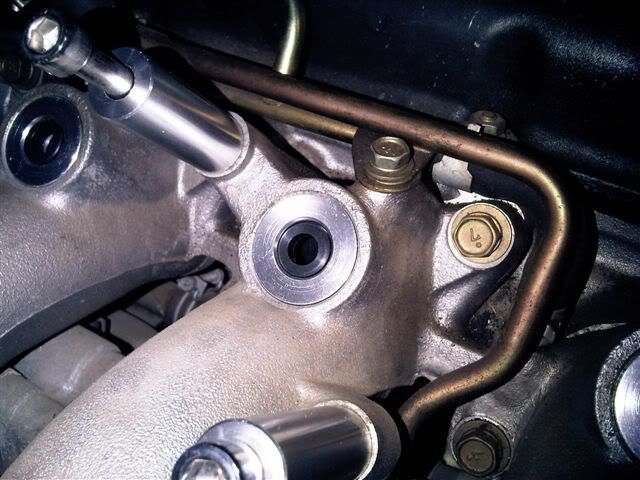
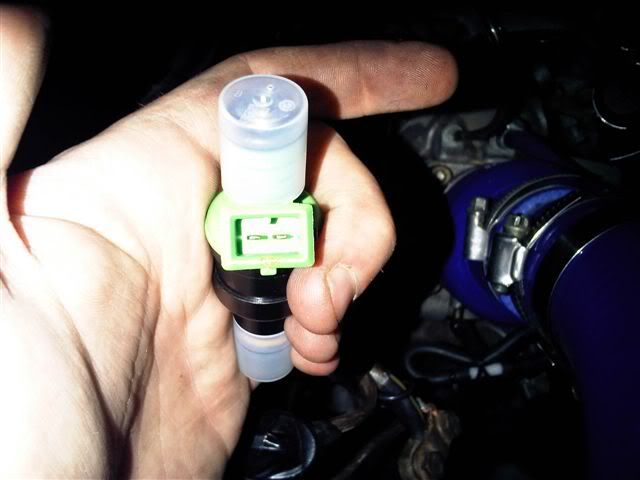
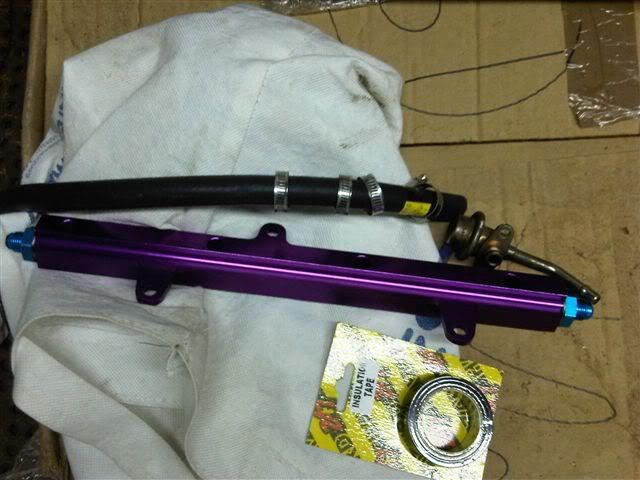
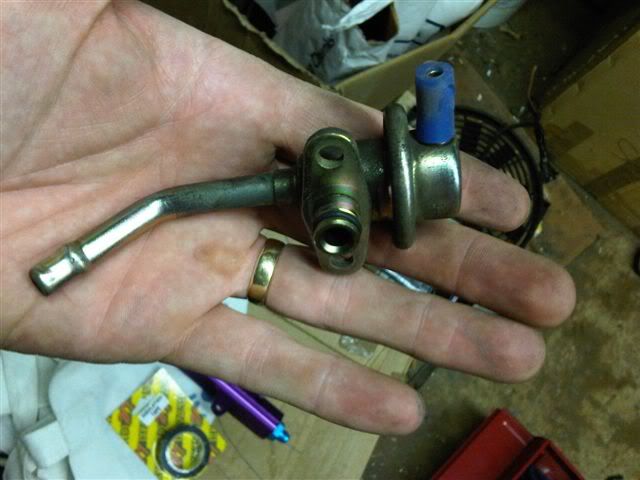
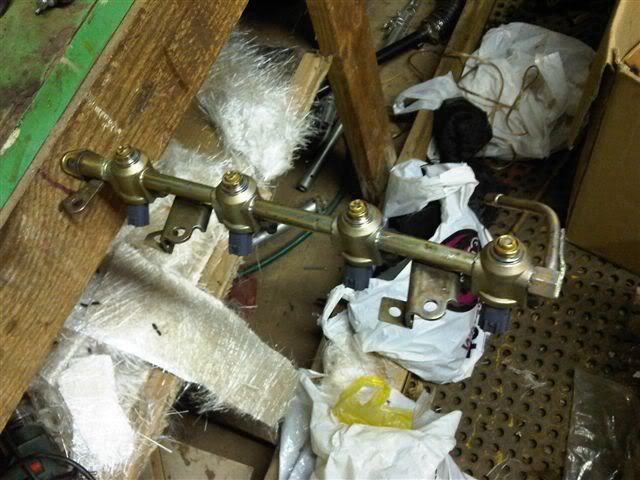
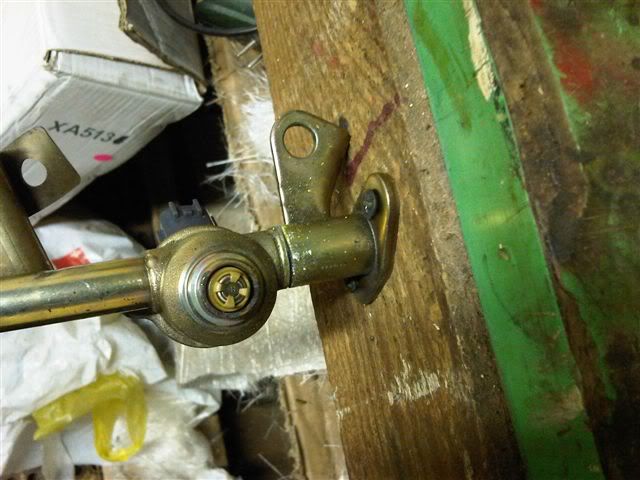
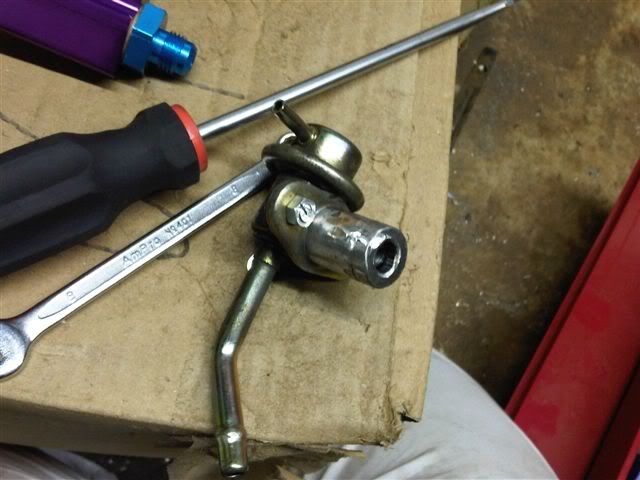
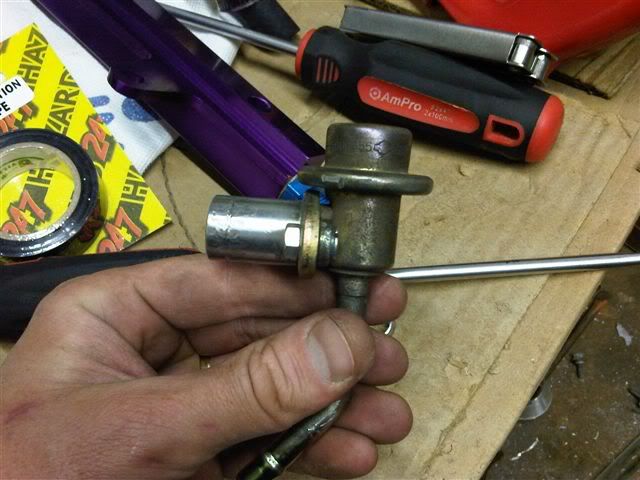
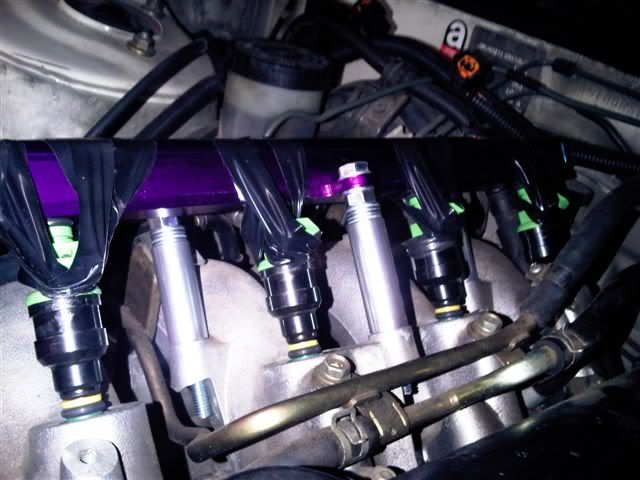
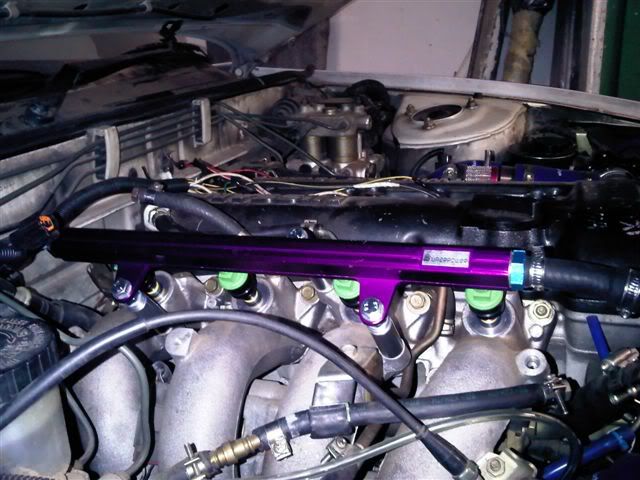
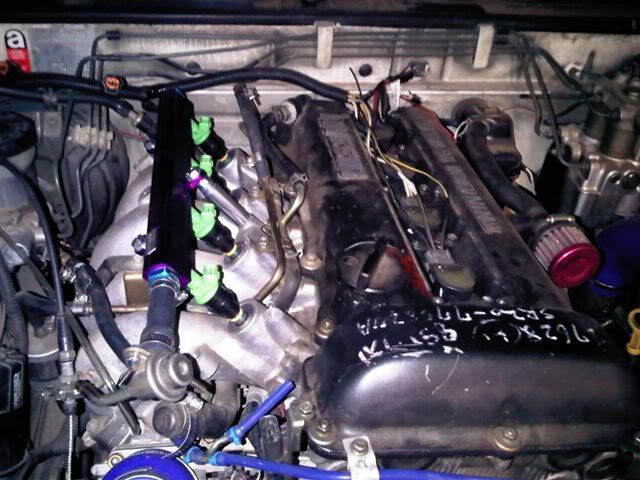
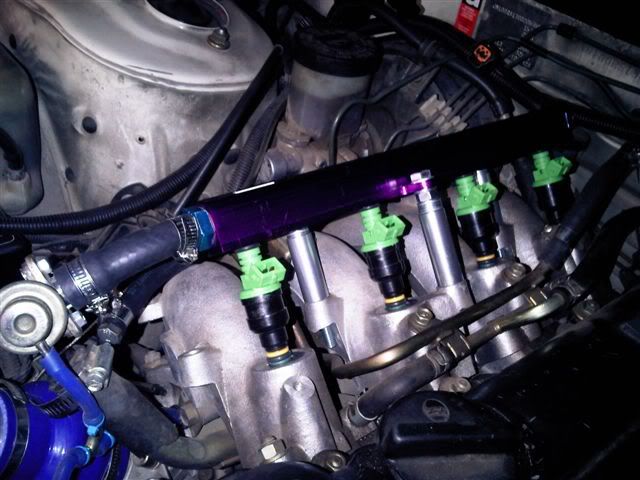
The standoffs & Bolts that I got with the Rail Kit wern't long enough so I had to make a plan. Also couldn't find adaptors for the thread types on the rails, so had to make a plan there too, also had to make another plan to get the vacume advance to fit
- Fuel Rail and 440cc Bosch Injector Settup
(Once again, I will do the texts later, but here are the Pics anyway)
The standoffs & Bolts that I got with the Rail Kit wern't long enough so I had to make a plan. Also couldn't find adaptors for the thread types on the rails, so had to make a plan there too, also had to make another plan to get the vacume advance to fit
Last edited by POWDER on Mon Nov 15, 2010 1:07 am, edited 1 time in total.
Carpe Diemotor - Sieze the motor today
- Nissan 200SX S13 92' SR20DET
http://200sx.za.net/phpBB3/garage_vehic ... cle&VID=14
- Nissan 200SX S13 92' SR20DET
http://200sx.za.net/phpBB3/garage_vehic ... cle&VID=14

-
POWDER
- Club Rep
- Posts: 1204
- Joined: Fri May 15, 2009 12:19 pm
- Car: S13
- Engine: SR
- Real Name: Mike
- Location: Johannesburg
Hey P3g4sus,
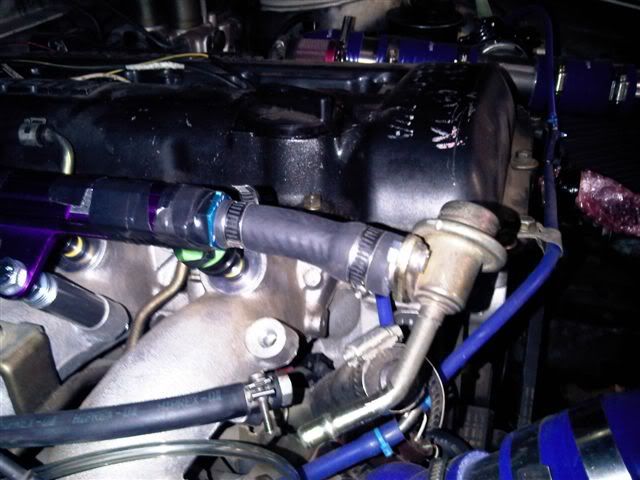
Shot, well as for the working, I know for a fact that I will have to change the hosing and clamps out for the fuel rail.... Lets not say how I figured that out, Will have to put some braided hose in place with screw type fixing.
Apologies to everyone for not keeping updated, lots done just time been tight.
Completed so far...
1. Dicktator totally rewired (Correctly)
2. New Alu Radiator and silicone water hose is in
3. Gauges have been completed (Took for ever to figure out where I am gonna put the clock and distance meter)
4. Injectors and Fuel Rail (Just needs braided hoses)
5. Oil Filter Re-locator, Just need Braided hoses
etc. etc.
Will update soon.... Probably only after Japfest though...
Carpe Diemotor - Sieze the motor today
- Nissan 200SX S13 92' SR20DET
http://200sx.za.net/phpBB3/garage_vehic ... cle&VID=14
- Nissan 200SX S13 92' SR20DET
http://200sx.za.net/phpBB3/garage_vehic ... cle&VID=14
-
POWDER
- Club Rep
- Posts: 1204
- Joined: Fri May 15, 2009 12:19 pm
- Car: S13
- Engine: SR
- Real Name: Mike
- Location: Johannesburg
P3g4sus: thanks for cursing me, well atleast now I can answer the question...P3g4sus wrote:Alot of plans, but the question is, did it work?!
Looking sweet!
Seems my plans for the clocks were a complete failure.... The clocks ended up sitting too deep into the dash and were blocked by the dash cross member... BUT not all lost, this led me to a new and better redesign of the clocks that now fits. I will hopefully have the wiring complete today before I leave for Zambia then post pics while on my trip.
I just hope I will have it all ready before Japfest.
Funds low now, anyone feel like sponsoring some braided feul lines and a pair of 1 meter braided oil relocator lines?
Carpe Diemotor - Sieze the motor today
- Nissan 200SX S13 92' SR20DET
http://200sx.za.net/phpBB3/garage_vehic ... cle&VID=14
- Nissan 200SX S13 92' SR20DET
http://200sx.za.net/phpBB3/garage_vehic ... cle&VID=14
-
POWDER
- Club Rep
- Posts: 1204
- Joined: Fri May 15, 2009 12:19 pm
- Car: S13
- Engine: SR
- Real Name: Mike
- Location: Johannesburg
11. Various cosmetic mods continues...
OK, well as for some cosmetic things, here are some pics for my new silicone water hoses and the new fan switch and water temp adapters.
Peugeot fan switched used, purely because it comes on a little earlier than the standard switch or a VW switch, should switch on the 2 X 12" Slimline fans at about 75*C. Hope you like.
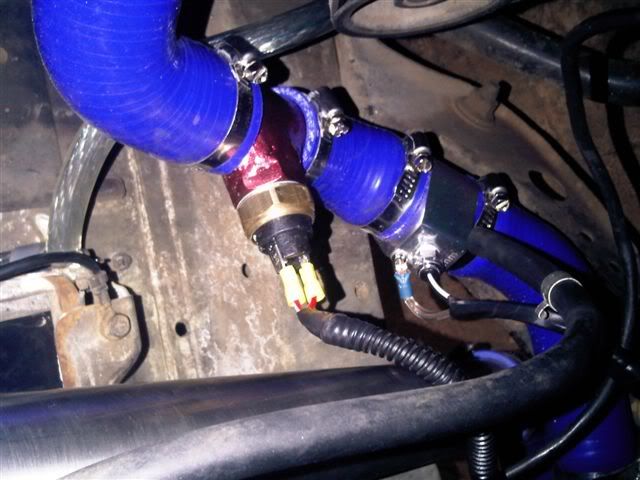
Carpe Diemotor - Sieze the motor today
- Nissan 200SX S13 92' SR20DET
http://200sx.za.net/phpBB3/garage_vehic ... cle&VID=14
- Nissan 200SX S13 92' SR20DET
http://200sx.za.net/phpBB3/garage_vehic ... cle&VID=14
-
POWDER
- Club Rep
- Posts: 1204
- Joined: Fri May 15, 2009 12:19 pm
- Car: S13
- Engine: SR
- Real Name: Mike
- Location: Johannesburg
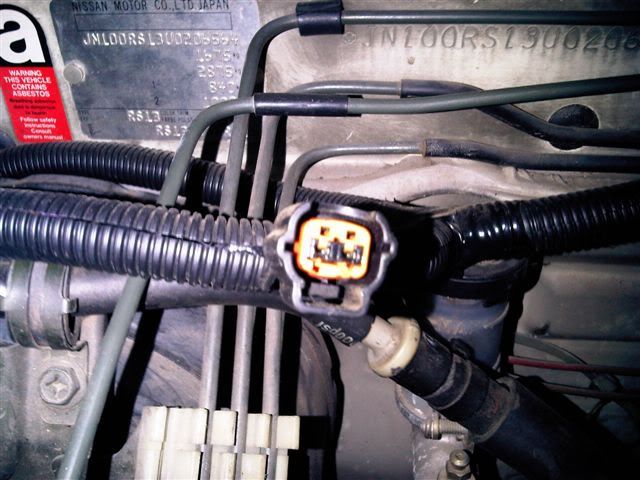
2. Dicktator 60-2 Wiring, timing wheel & hall effect pickup install + setup
Dicktator wiring is complete, Finally...
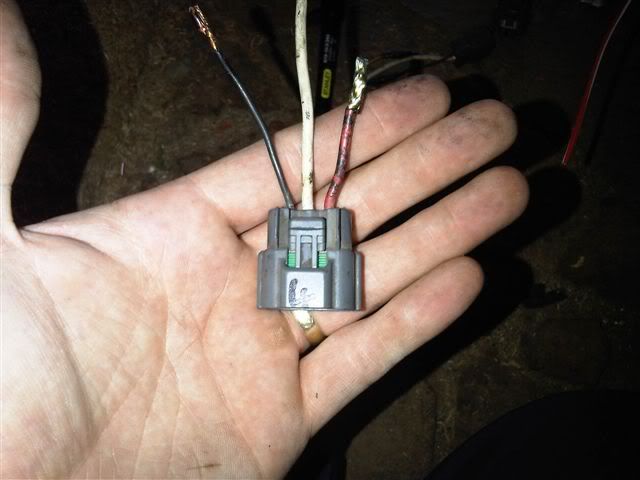
Looking at the plug from this side, the total left wire gets earthed to your chassis or engine ground, the middle wire is the common positive from your dicktator and the wire on the right is your coil signal wires from the dicktator, you wire coil 1 & 3 on the yellow/green wire and coil 2 & 4 on the yellow/black wire.
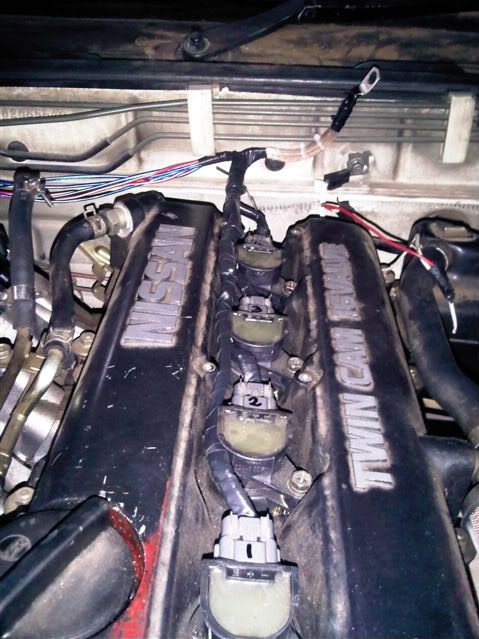
All 4 coils now wired and earth conected with 16ga speaker cable to the body ground for clear strong spark.

As you can see, all wiring wired and covered
As you can see, all injectors run on a common positive, then coils 1 & 2 run off dicktator brown wire originating from pin 20 and 3 & 4 run on brown wire from pin 19, you can use a multi meter to check which wire is on which pin.
Please note, looking at the plugs from the top, driver side, the right pin is positive (Common from dicktator) and the left is the signal (Pin 19 & 20 Brown from dicktator)
Dicktator wiring is complete, Finally...
Looking at the plug from this side, the total left wire gets earthed to your chassis or engine ground, the middle wire is the common positive from your dicktator and the wire on the right is your coil signal wires from the dicktator, you wire coil 1 & 3 on the yellow/green wire and coil 2 & 4 on the yellow/black wire.
All 4 coils now wired and earth conected with 16ga speaker cable to the body ground for clear strong spark.
As you can see, all wiring wired and covered
As you can see, all injectors run on a common positive, then coils 1 & 2 run off dicktator brown wire originating from pin 20 and 3 & 4 run on brown wire from pin 19, you can use a multi meter to check which wire is on which pin.
Please note, looking at the plugs from the top, driver side, the right pin is positive (Common from dicktator) and the left is the signal (Pin 19 & 20 Brown from dicktator)
Carpe Diemotor - Sieze the motor today
- Nissan 200SX S13 92' SR20DET
http://200sx.za.net/phpBB3/garage_vehic ... cle&VID=14
- Nissan 200SX S13 92' SR20DET
http://200sx.za.net/phpBB3/garage_vehic ... cle&VID=14
-
POWDER
- Club Rep
- Posts: 1204
- Joined: Fri May 15, 2009 12:19 pm
- Car: S13
- Engine: SR
- Real Name: Mike
- Location: Johannesburg
4. Custom Dash dials rebuild with after market gauges
Hey Guys,
A slight failure on the clocks settup that I did ment that the clocks could not fit into the dash due to the dash cross member thing being in the way.
But not to worry, now re-designed and guaranteed to fit this time round...
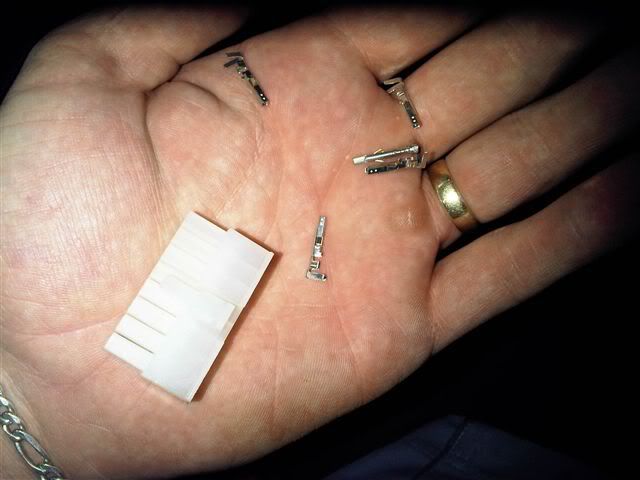
You might want to try get hold of some of these MOLEX plugs and pins to replace on the harness if you want to do a dash replacement / mod.
AP Electronics in Commissioner street Johannesburg was my dealer...
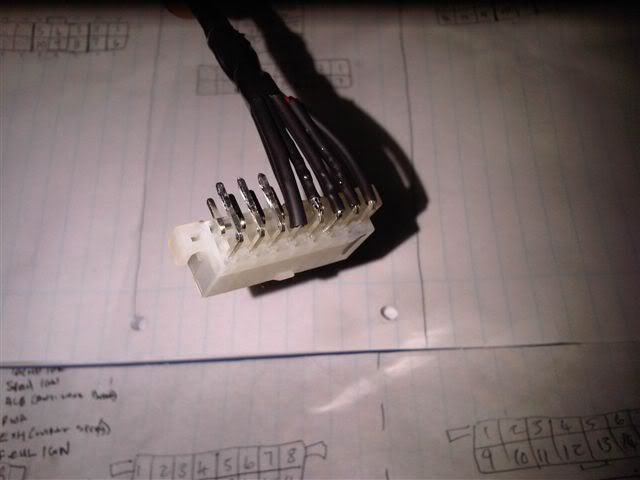
The other side of the MOLEX
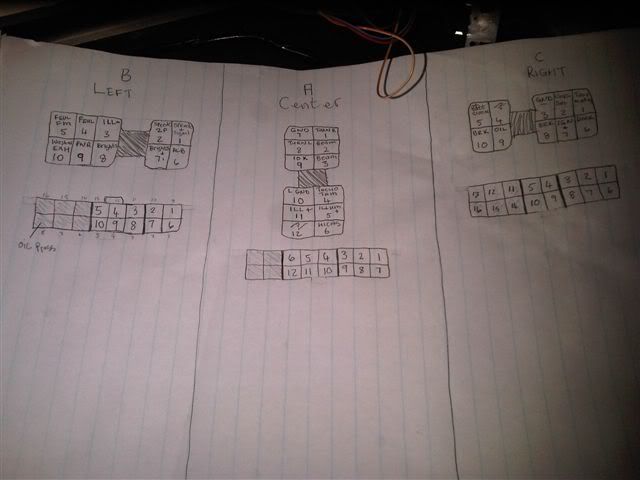
A little pin out drawing of the old plugs versus new molex plugs
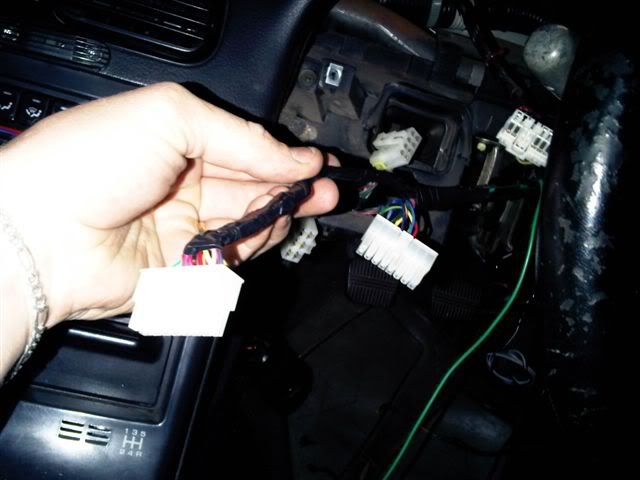
Here is what they look like installed
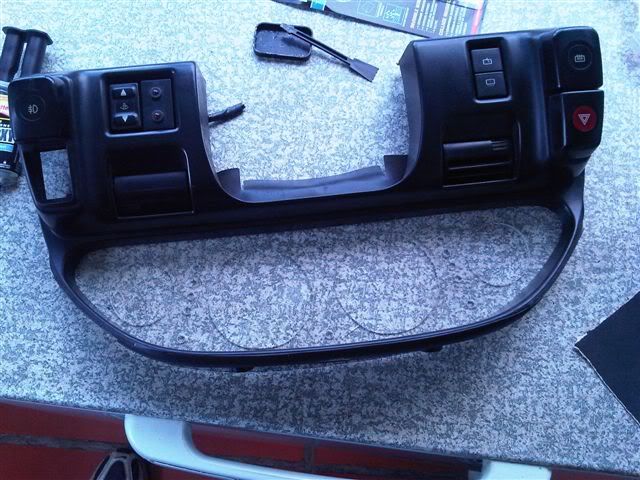
The new idea is to loose the original clock chassis completely, I decided to build the clocks directly onto the clock fascia panel. If you decide to spray it, remember to remove all switches before you spray.
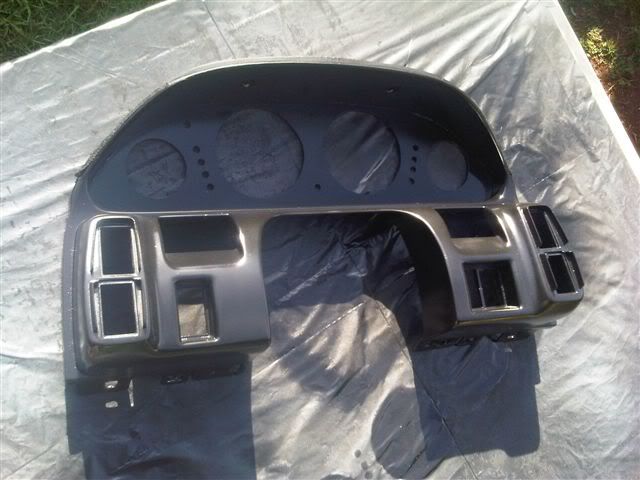
I used a primmer then black with a clear coat over that.
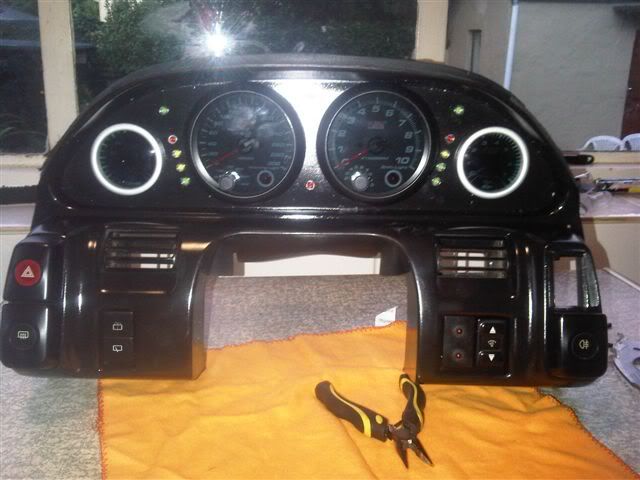
and this is what it looks like with the clocks fixed. I just want to still do a little something on the color of the backing plate a little later on though to give a bit of contrast to it, I just couldn't find my gun metal spray.
Hey Guys,
A slight failure on the clocks settup that I did ment that the clocks could not fit into the dash due to the dash cross member thing being in the way.
But not to worry, now re-designed and guaranteed to fit this time round...
You might want to try get hold of some of these MOLEX plugs and pins to replace on the harness if you want to do a dash replacement / mod.
AP Electronics in Commissioner street Johannesburg was my dealer...
The other side of the MOLEX
A little pin out drawing of the old plugs versus new molex plugs
Here is what they look like installed
The new idea is to loose the original clock chassis completely, I decided to build the clocks directly onto the clock fascia panel. If you decide to spray it, remember to remove all switches before you spray.
I used a primmer then black with a clear coat over that.
and this is what it looks like with the clocks fixed. I just want to still do a little something on the color of the backing plate a little later on though to give a bit of contrast to it, I just couldn't find my gun metal spray.
Carpe Diemotor - Sieze the motor today
- Nissan 200SX S13 92' SR20DET
http://200sx.za.net/phpBB3/garage_vehic ... cle&VID=14
- Nissan 200SX S13 92' SR20DET
http://200sx.za.net/phpBB3/garage_vehic ... cle&VID=14
-
POWDER
- Club Rep
- Posts: 1204
- Joined: Fri May 15, 2009 12:19 pm
- Car: S13
- Engine: SR
- Real Name: Mike
- Location: Johannesburg
Ha ha, no worries cuz, your question led me to think about alot of faults in my settup, so not a loss at all... Actually a constructive hint the way I see it...P3g4sus wrote:Nice man! sorry for the jinxing!
But still looking good!
Carpe Diemotor - Sieze the motor today
- Nissan 200SX S13 92' SR20DET
http://200sx.za.net/phpBB3/garage_vehic ... cle&VID=14
- Nissan 200SX S13 92' SR20DET
http://200sx.za.net/phpBB3/garage_vehic ... cle&VID=14

-
POWDER
- Club Rep
- Posts: 1204
- Joined: Fri May 15, 2009 12:19 pm
- Car: S13
- Engine: SR
- Real Name: Mike
- Location: Johannesburg
Thanks cuz, much appreciated...Draco wrote:Powder...looks good...very good!!
Carpe Diemotor - Sieze the motor today
- Nissan 200SX S13 92' SR20DET
http://200sx.za.net/phpBB3/garage_vehic ... cle&VID=14
- Nissan 200SX S13 92' SR20DET
http://200sx.za.net/phpBB3/garage_vehic ... cle&VID=14
-
POWDER
- Club Rep
- Posts: 1204
- Joined: Fri May 15, 2009 12:19 pm
- Car: S13
- Engine: SR
- Real Name: Mike
- Location: Johannesburg
Aaaaaarrrr, WOHOO....
One of my budies has just shipped me this --> Nismo Oil Filler Cap - CNC Billet Aluminum
Original nogal.....
One of my budies has just shipped me this --> Nismo Oil Filler Cap - CNC Billet Aluminum
Original nogal.....
Carpe Diemotor - Sieze the motor today
- Nissan 200SX S13 92' SR20DET
http://200sx.za.net/phpBB3/garage_vehic ... cle&VID=14
- Nissan 200SX S13 92' SR20DET
http://200sx.za.net/phpBB3/garage_vehic ... cle&VID=14
